tar -xzf CCseqBasicF-1.0.2.tar.gz (VS1.0.2) # Unpack your download
    chmod -R uga+x CCseqBasicF-1.0.2/bin      (VS1.0.2)      # Run permissions to the helper scripts in /bin folder
    chmod    uga+x CCseqBasicF-1.0.2/*.sh     (VS1.0.2)      # Run permissions to the main runner scripts
                                                               CCseqBasic5.sh and testEnvironment.sh
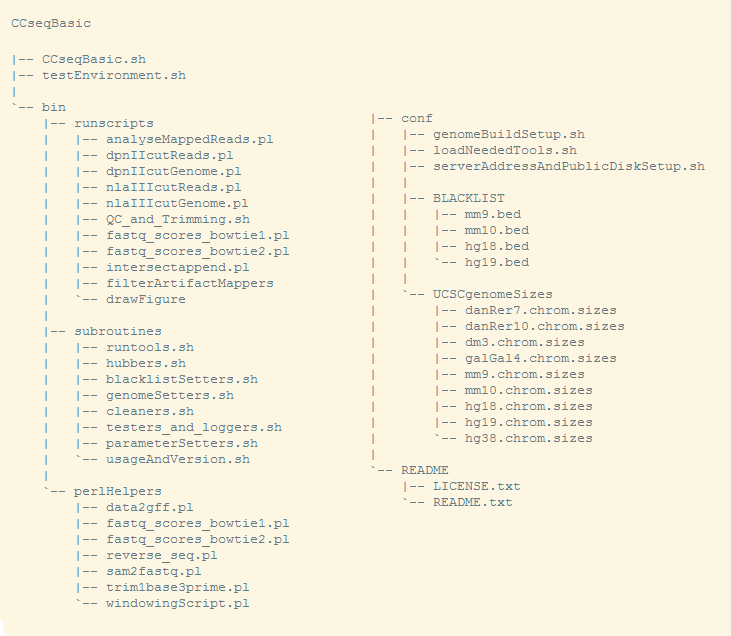
You can check with 'tree' command, that your unpacked folder looks like below :
CCseqBasicF-VS1.0.2/testEnvironment.sh (VS1.0.2) # Check that unpacking went fine
You should see a couple of WARNINGs (as you haven't set up your bowtie index locations etc), but you should see no ERRORs.
For automating the testing (bioConda support etc) : The return value of testEnvironment.sh is '0' if all clear or only warnings, and '1' if fatal errors were encountered.
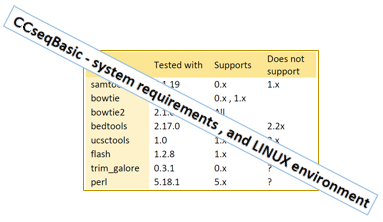
CCseqBasic has a configuration file for the needed tools (see the full list here ),
When you run CCseqBasic, it will load the abovementioned tools from the locations you give to it in the configuration file :
nano CCseqBasicF-VS1.0.2/conf/loadNeededTools.sh (VS1.0.2) # Fill in your tool locations here
You can fill the file in two ways - by using 'module' system, or adding straight to the path :
If you want to use module system
    useModuleSystem=1
    # useModuleSystem=1 : load via module system (set module names below)
    # useModuleSystem=0 : no not load via module system
If you instead want to set direct paths
    setPathsHere=1
    # setPathsHere=1 : set the paths below
    # setPathsHere=0 : do not use direct paths
If you set both off, no tools are loaded
    useModuleSystem=0
    setPathsHere=0
If you have all the needed toolkits in your PATH already, you want to turn the above feature off.
To do this, set :
setToolLocations=0 # The first line of the above file. This turns the setup of the tools off.
CCseqBasicF-VS1.0.2/testEnvironment.sh (VS1.0.2) # Check that all your settings are the way you wanted them
Now you will probably see ERRORS in the end of the test, as you haven't set your bowtie indices, and server address yet.
Just check that the first part (setting the toolkits) goes through without errors.
nano CCseqBasicF-VS1.0.2/conf/genomeBuildSetup.sh (VS1.0.2) # Instructions as comment lines in the file
Below some notes about this - should you need guidance !
You don't need to use all the genomes the pipeline is "supporting" - just remove the unwanted genomes from the list of supported genomes (following instructions in the file).
You need to make sure the builds you support, are in same ORDER in all the lists ( say, that mm9 build is always FIRST, hg18 is always SECOND etc ). Otherwise you mix up your builds and get funny results !
The pipeline requires already-made bowtie genome indices (for the genome builds you are interested in), built using the UCSC genome build fasta.
If you have ever mapped your data using bowtie (using UCSC, not Ensembl genome), you will already have these.
Update the above genomeBuildSetup.sh file - to point to these bowtie/bowtie2 index locations !
The pipeline was tested using Illumina iGenomes indices, which are recommended by the Bowtie website. These can be fetched from the bowtie/bowtie2 web sites or from iGenomes site (links below).
Bowtie1 website (right hand side panel : "pre-built indices")
Bowtie2 website (right hand side panel : "pre-built indices")
Illumina iGenomes indices (Each iGenomes download will contain pre-made bowtie1 and bowtie2 indices.)
You can also build your own indices (from any UCSC supported FASTA files) - and add them to the pipeline.
If you generate your own index, remember to make the UCSC chromosome size file for that, as well, and give its path in the genomeBuildSetup.sh file as well. For all UCSC-supported builds you can fetch the chromosome sizes file like this : fetchChromSizes mm9 > mm9.sizes.txt (fetches the mm9 build chromSizes file). The fetchChromSizes is part of UCSCtools toolkit, individual tools downloadable here.
You can also provide Blacklisted regions (if you need them for other genomes than mm9,mm10,hg18,hg19) :
The blacklist is used to filter artifactual peaks from the data - in-house (WIMM) peak call is used for mm9, mm10, and Duke University blacklisted is used for hg18/hg19.
To see the documentation : the Duke University "blacklisted" track (human genome hg19) is available in this site.
You can replace the default ones with your own blacklisting files, and/or add blacklists for genomes the pipe does not yet provide a blacklist for - in the setup file above !
CCseqBasicF-VS1.0.2/testEnvironment.sh (VS1.0.2) # Check that all your settings are the way you wanted them
Now you will probably see an ERROR in the end of the test, as you haven't set your server address yet.
Just check that the first part (setting the toolkits), and second part (bowtie indices) go through without errors.
nano CCseqBasicF-VS1.0.2/conf/serverAddressAndPublicDiskSetup.sh (VS1.0.2)#Instructions as comment lines in the file
The pipeline uses UCSC data hub to visualise the data. UCSC data hubs are loaded via publicly available "data hubs" ( how to use a data hub ).
To run the pipeline (to make the data hub), you need a server address, and access to the disk area visible via the server address.
Your command line tools should be allowed to write into this publicly visible disk area ( i.e. wherever you run the pipeline, you should have the public area visible and write-able).
If you don't know if you have this, ask your system admin / IT support !
CCseqBasicF-VS1.0.2/testEnvironment.sh (VS1.0.2) # Check that all your settings are the way you wanted them
Now you should not see any ERRORS during the test, as you have set all the needed (1) toolkits, (2) bowtie indices, and (3) server address.
export PATH=${PATH}:/where/you/unpacked/it/CCseqBasicF-VS1.0.2
    CCseqBasic5.sh --help
    CCseqBasicF-VS1.0.2/CCseqBasic5.sh --help      (VS1.0.2)